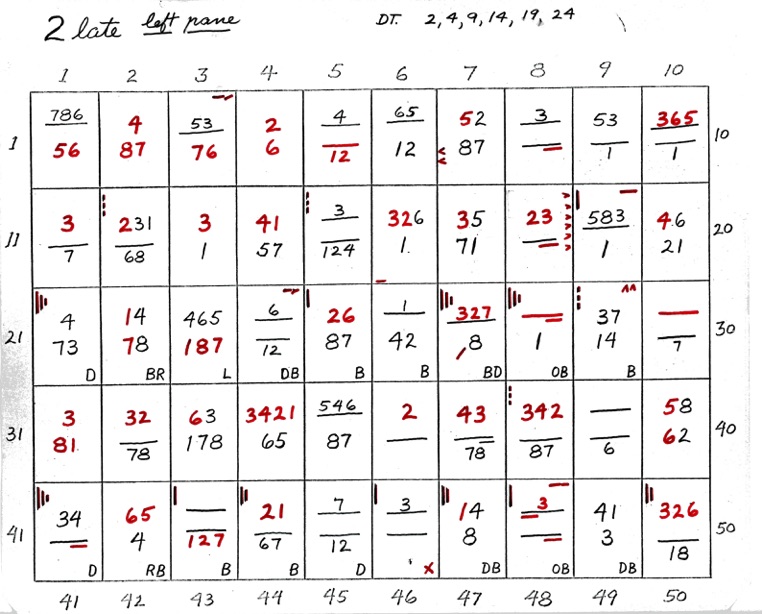
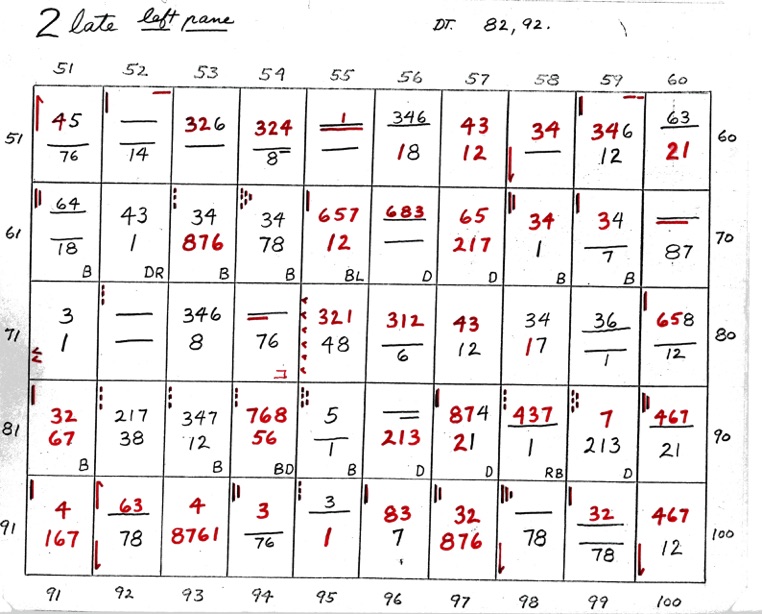
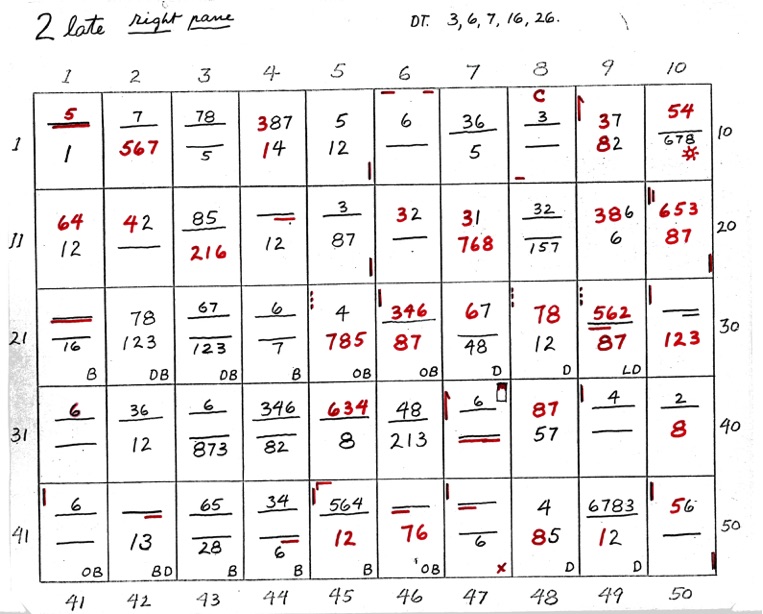
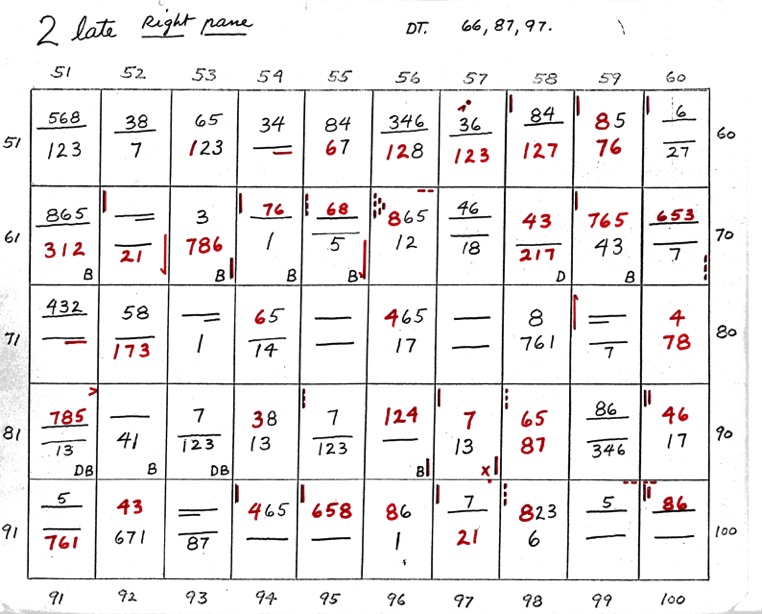
DeVere Card Plating System Charts:
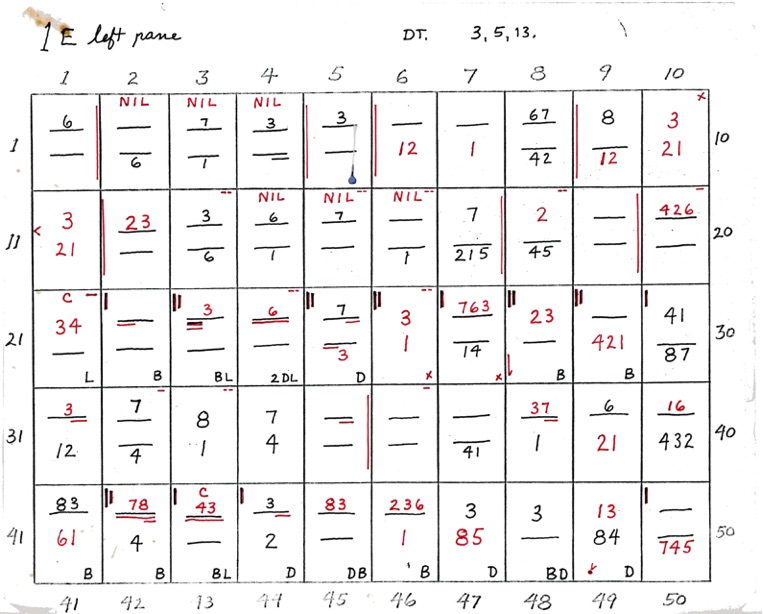
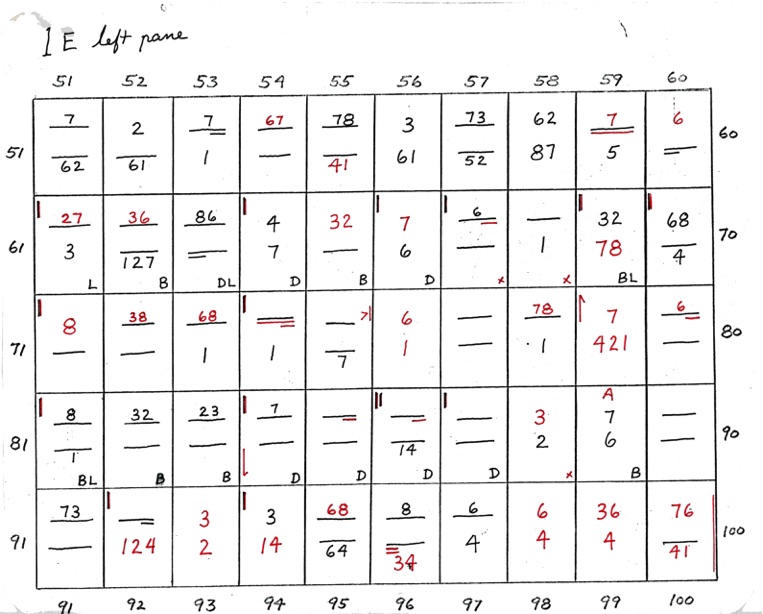
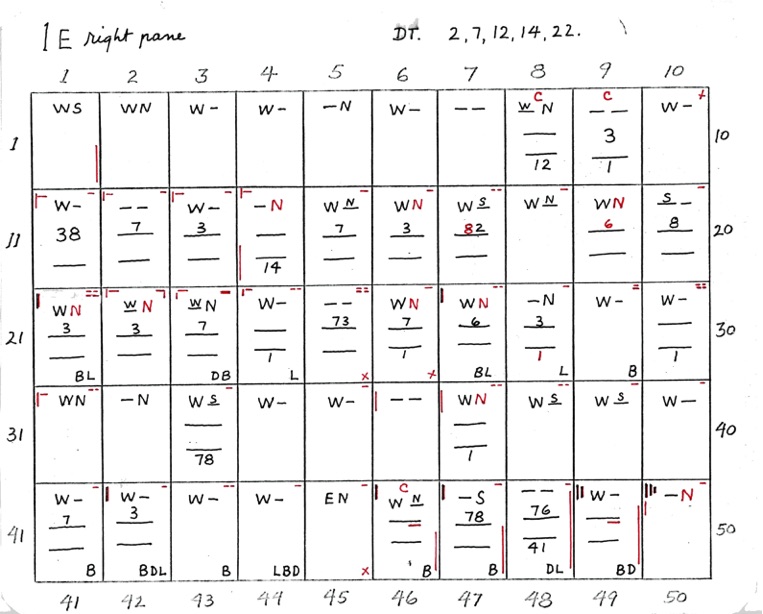
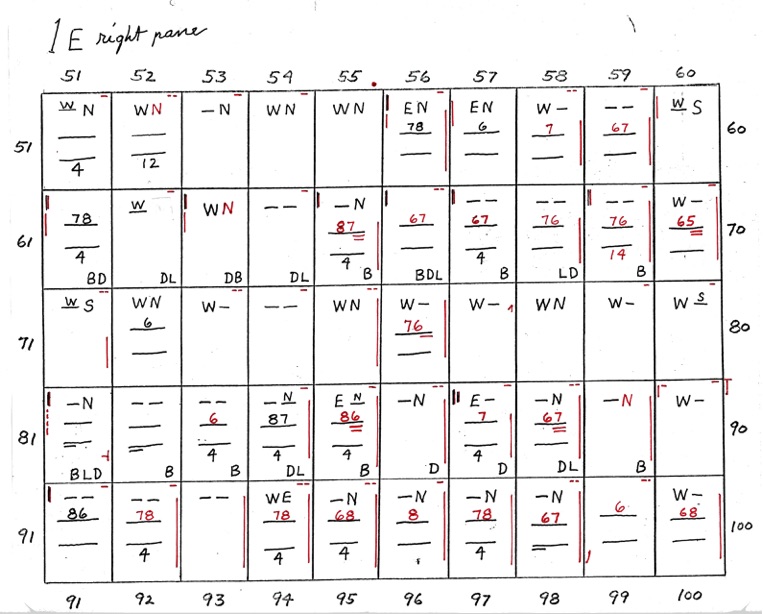
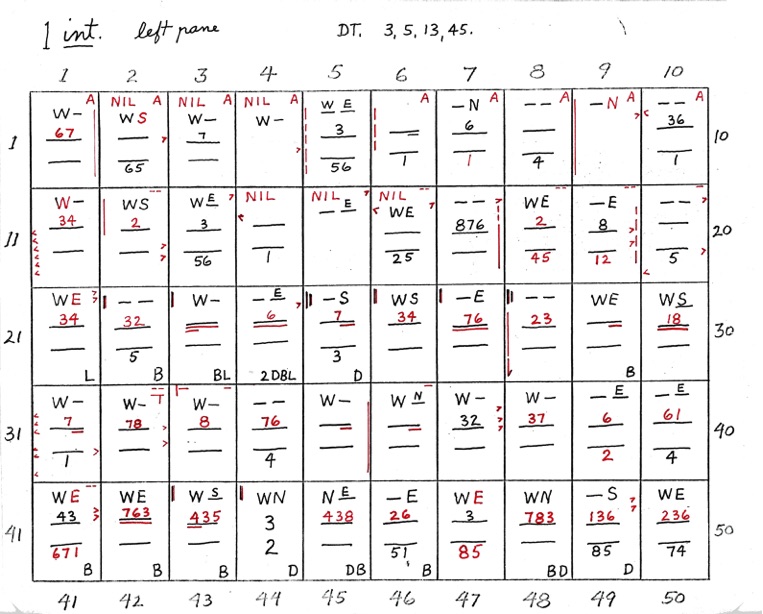
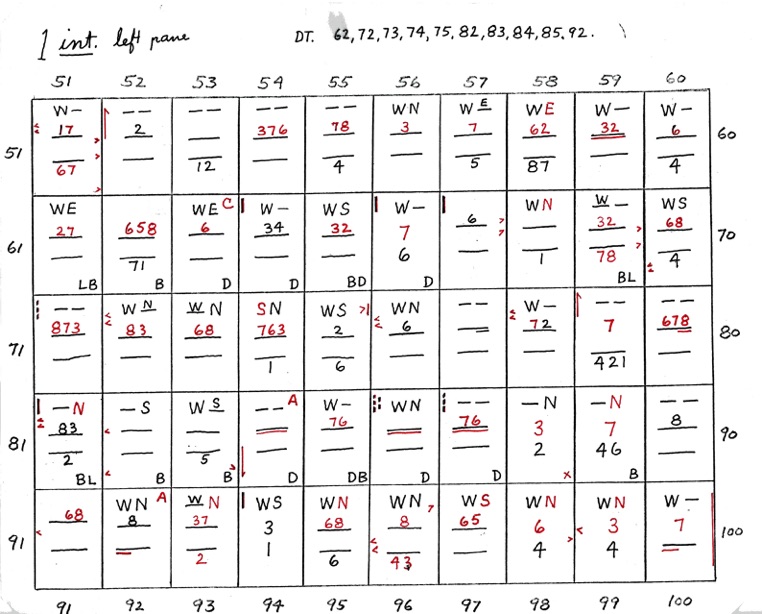
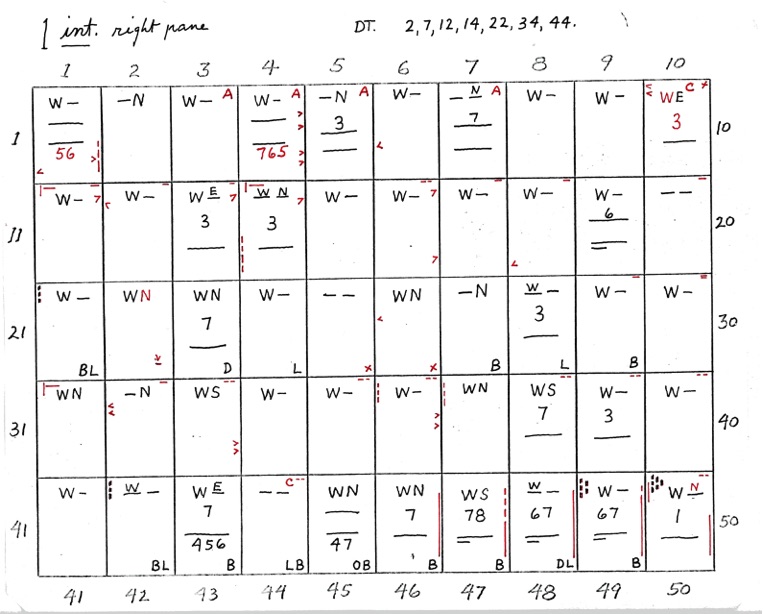
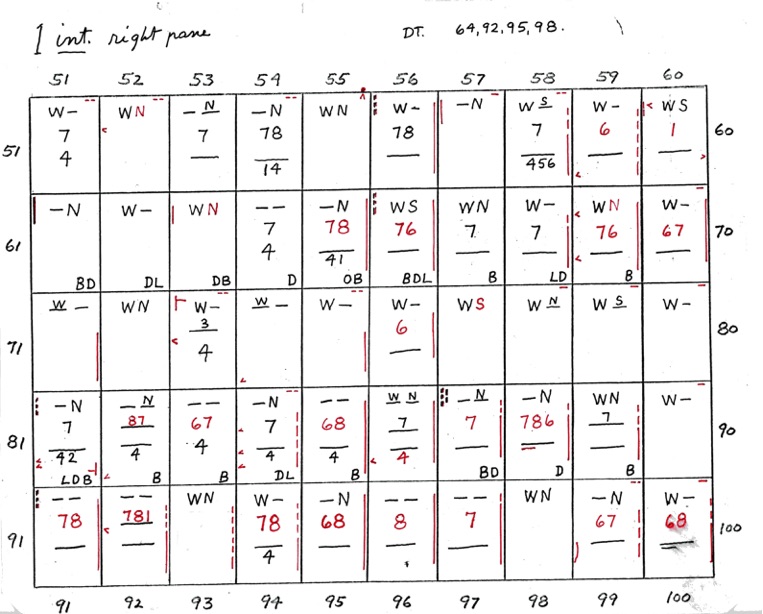
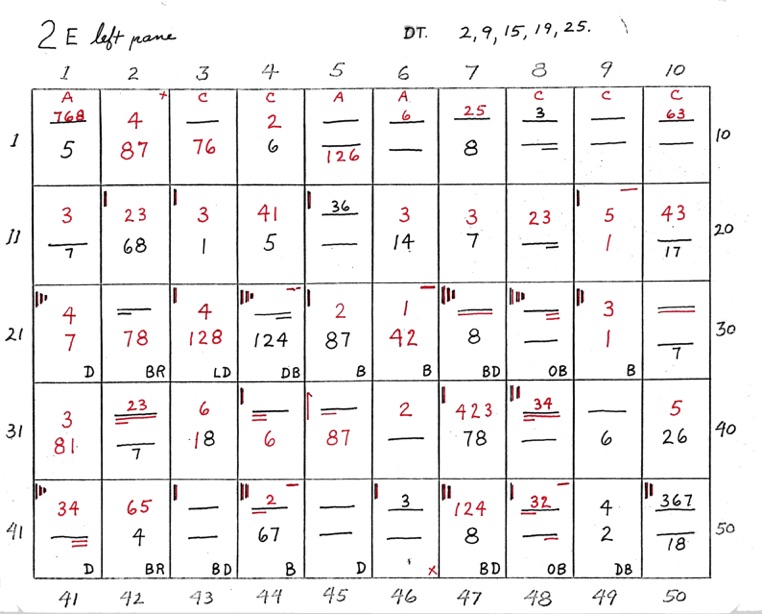
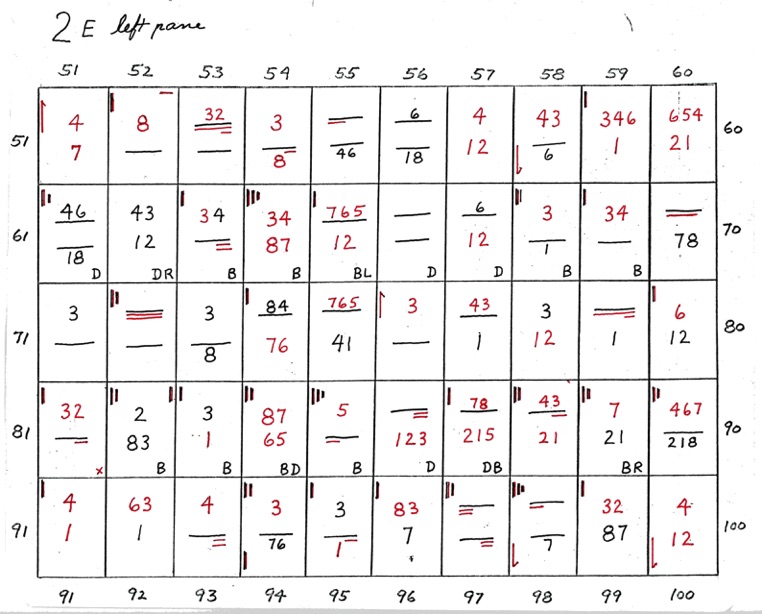
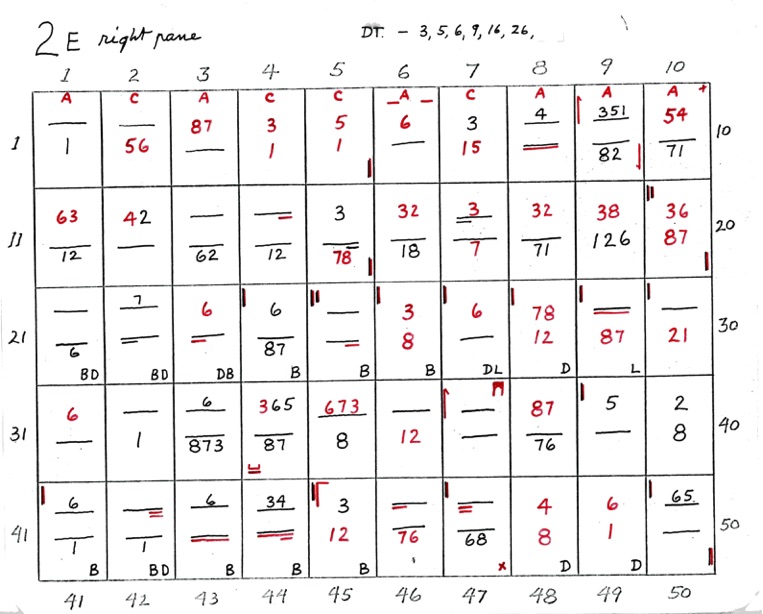
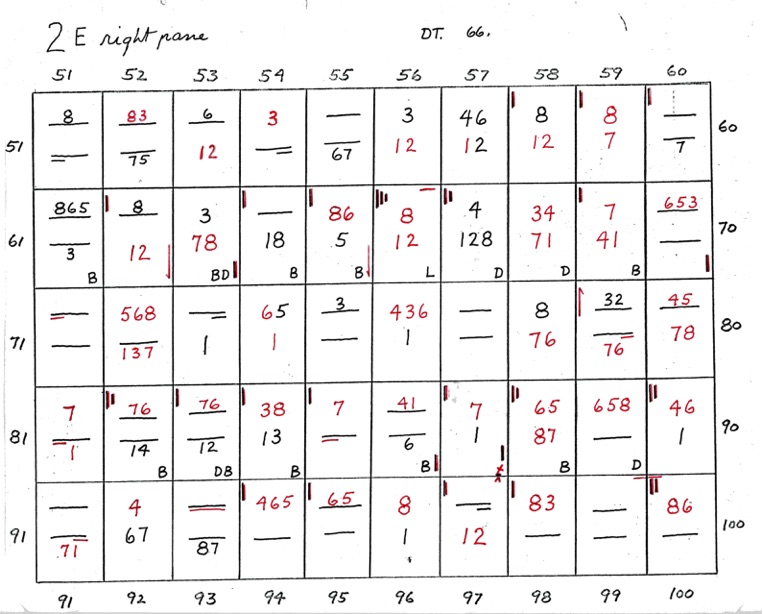
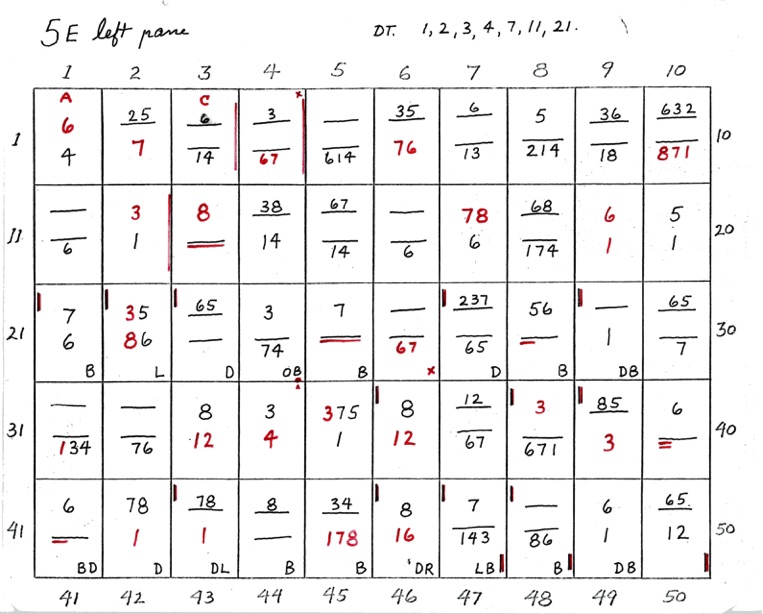
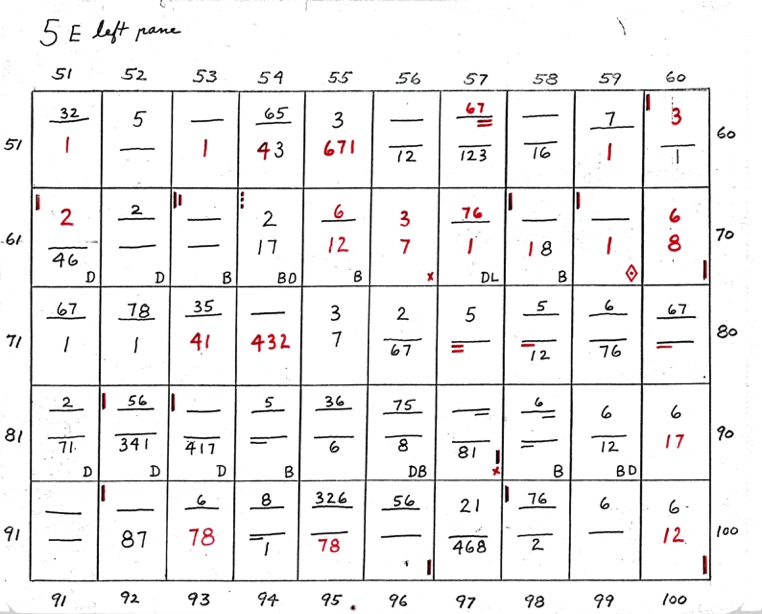
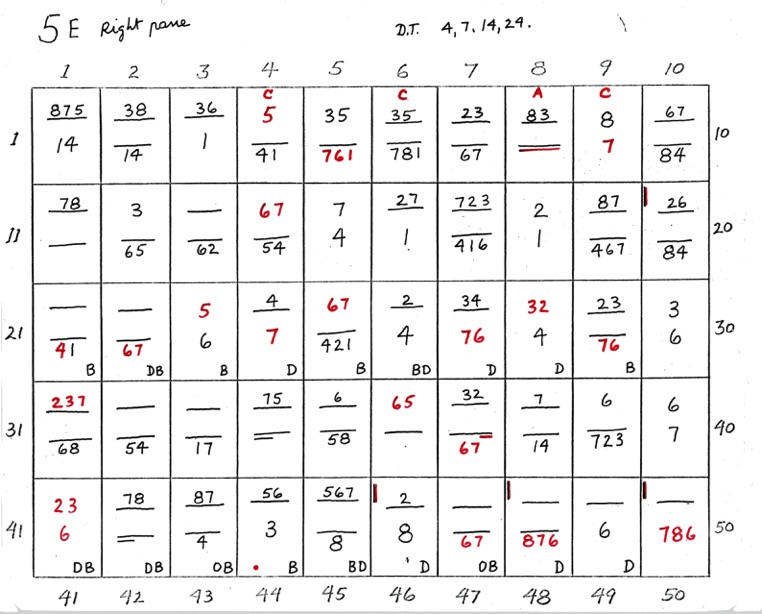
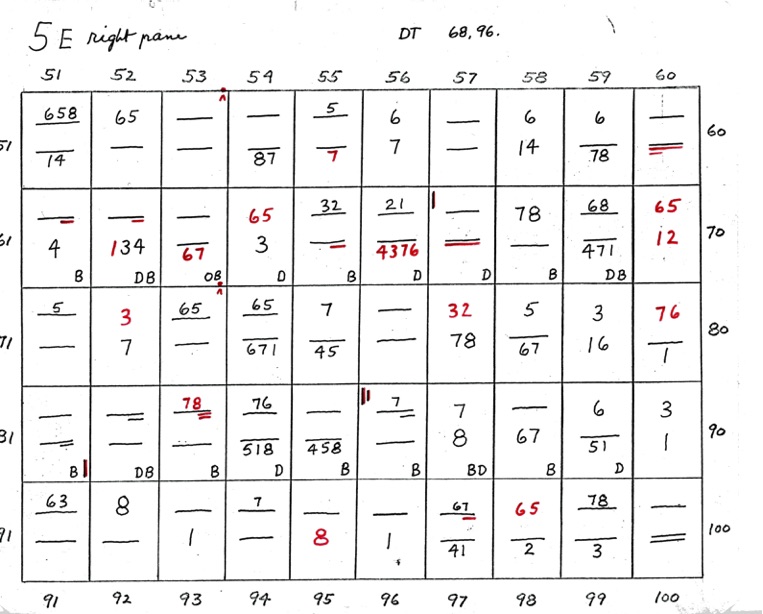
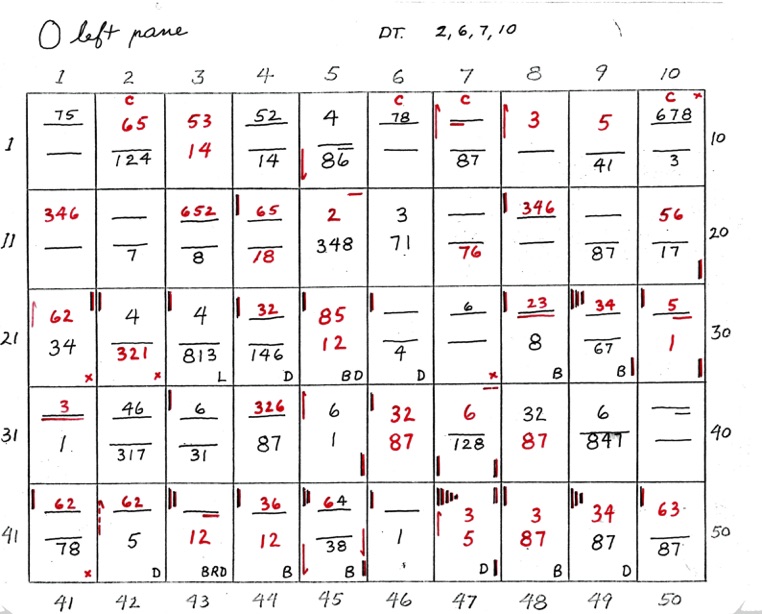
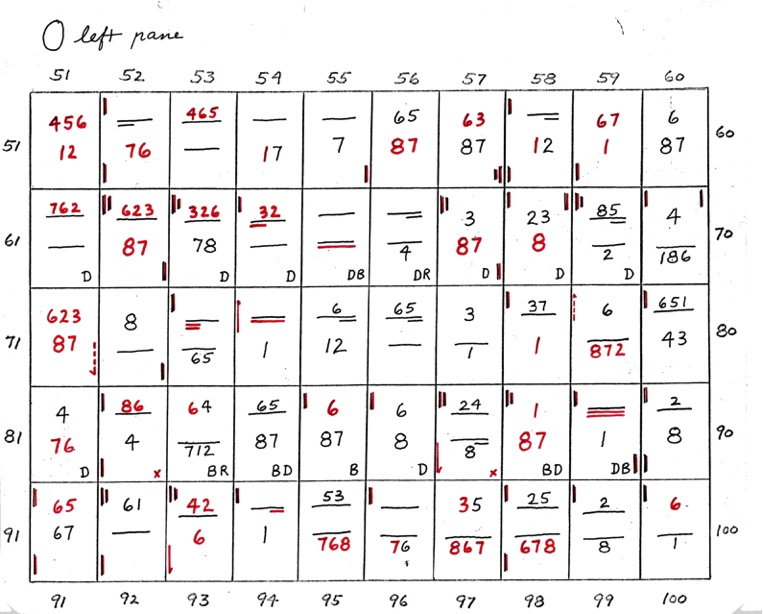
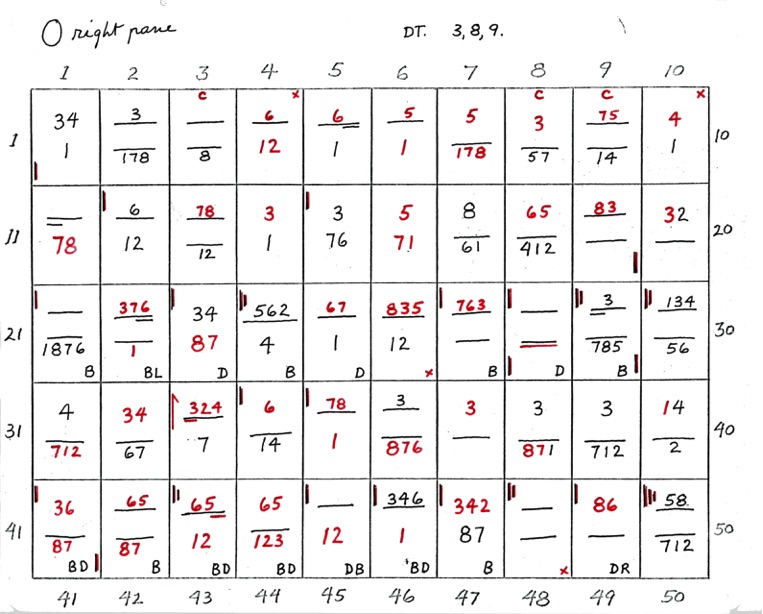
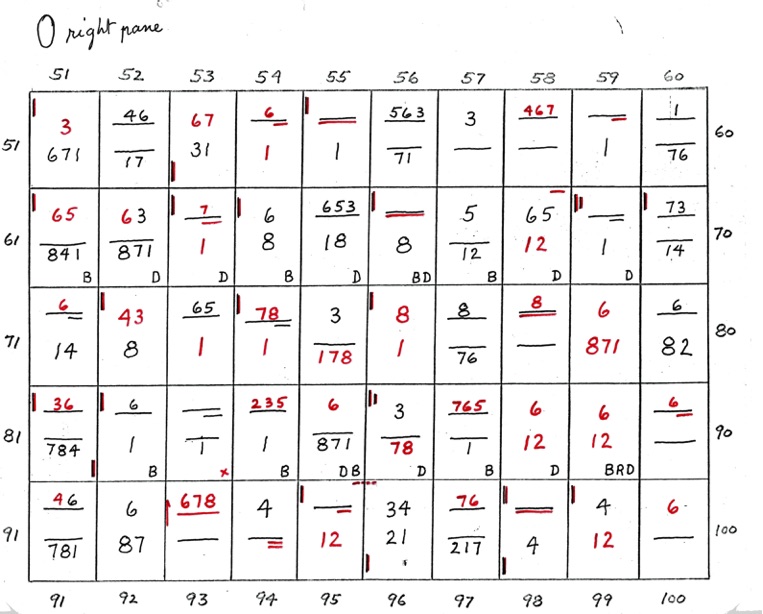
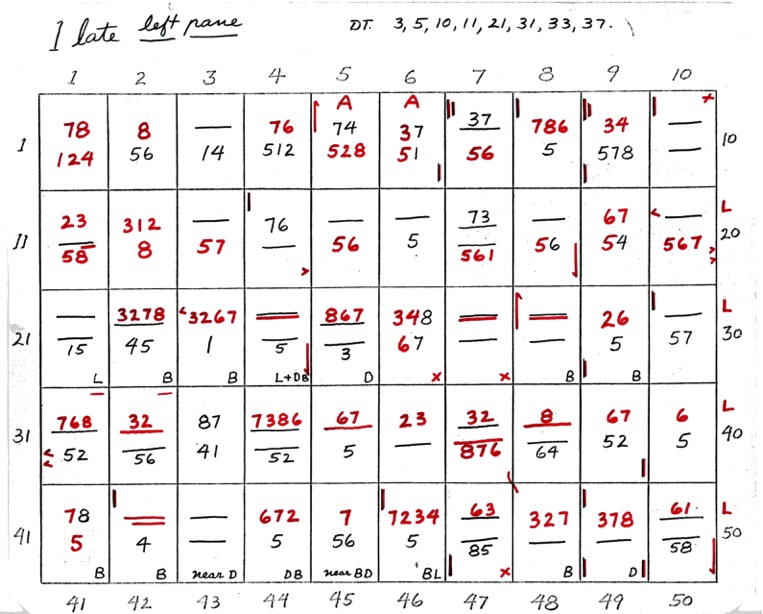
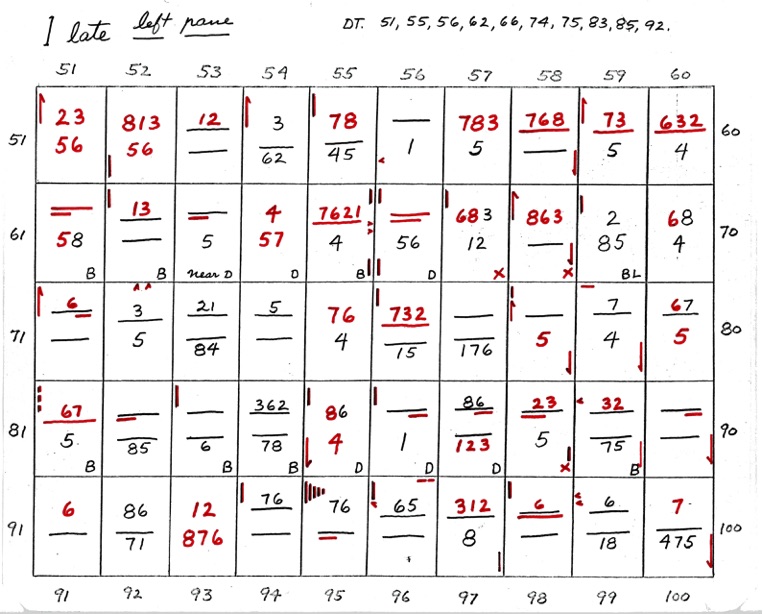
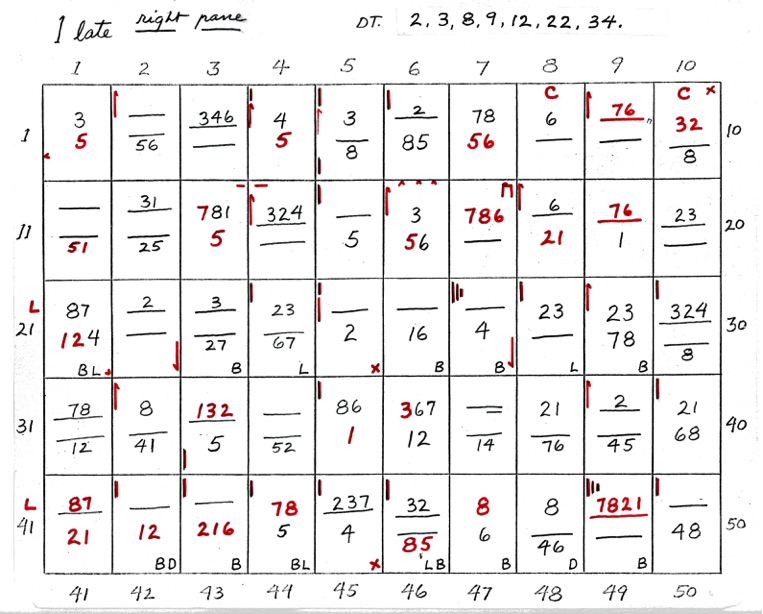
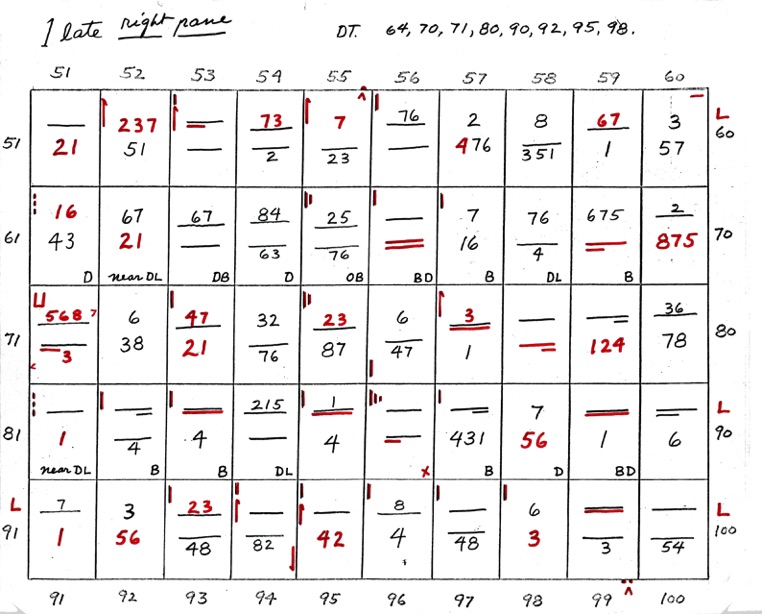
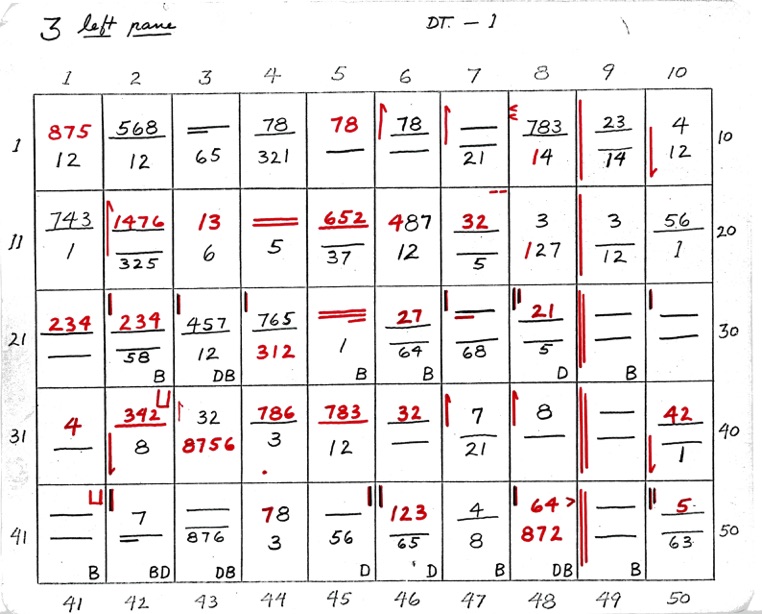
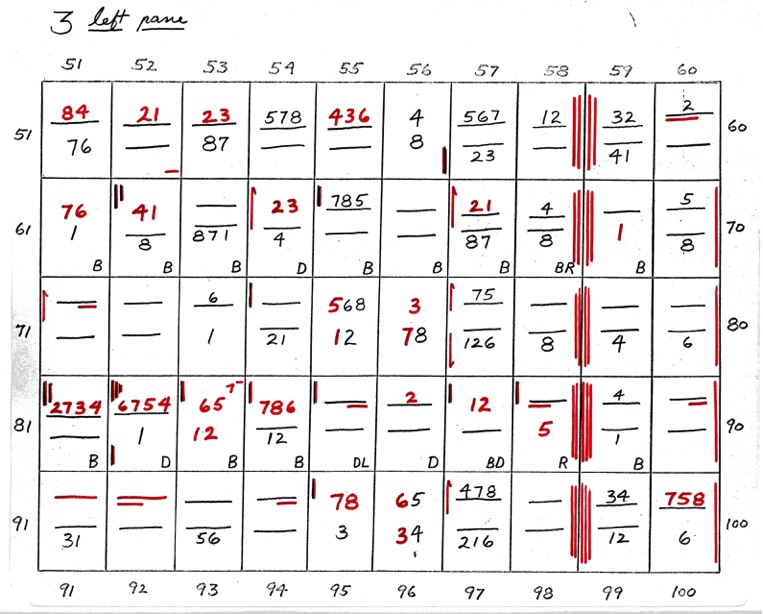
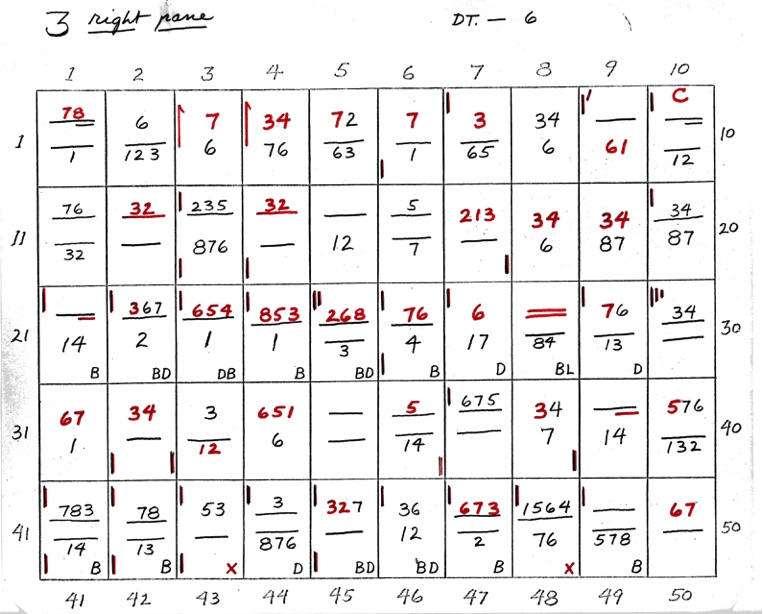
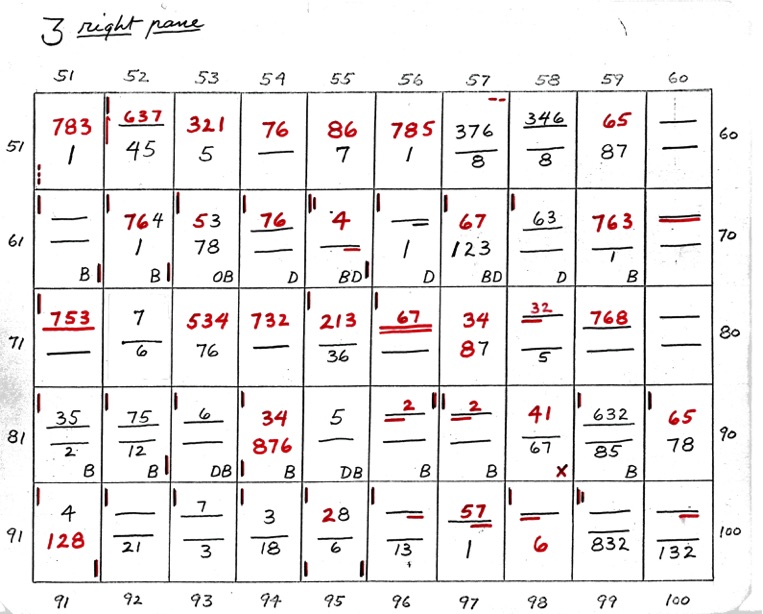
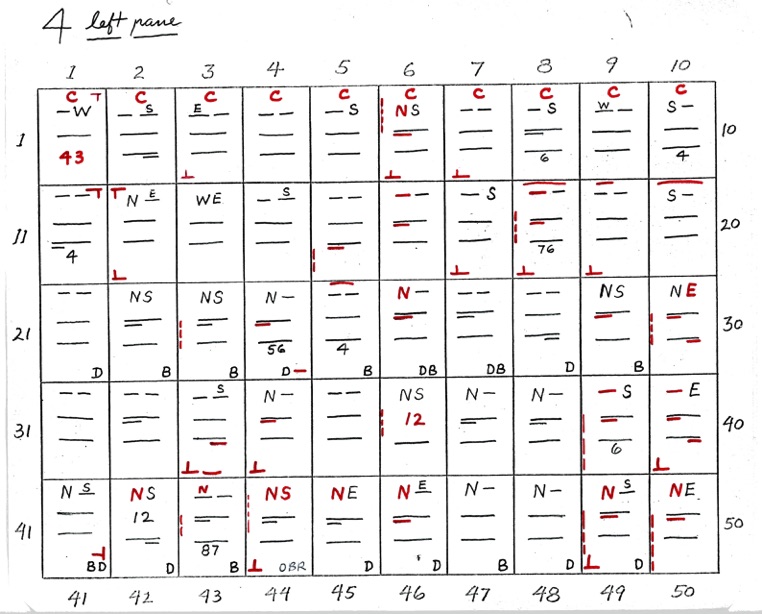
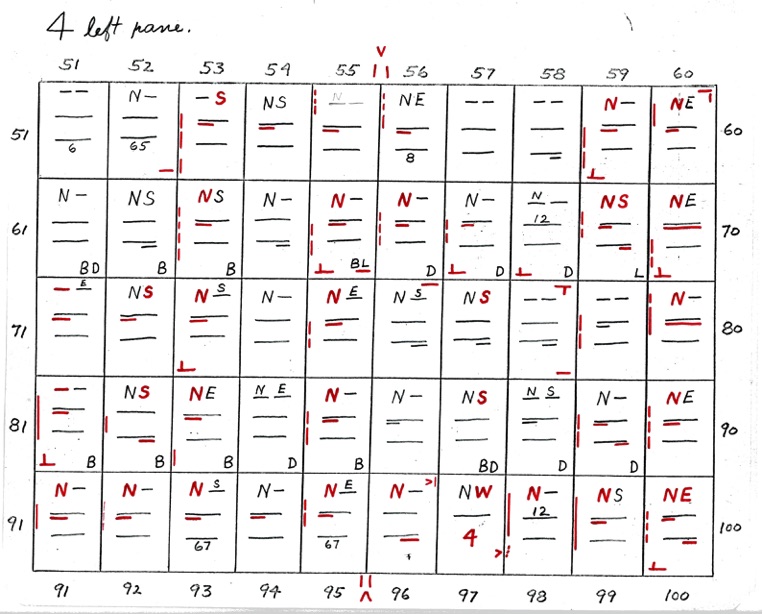
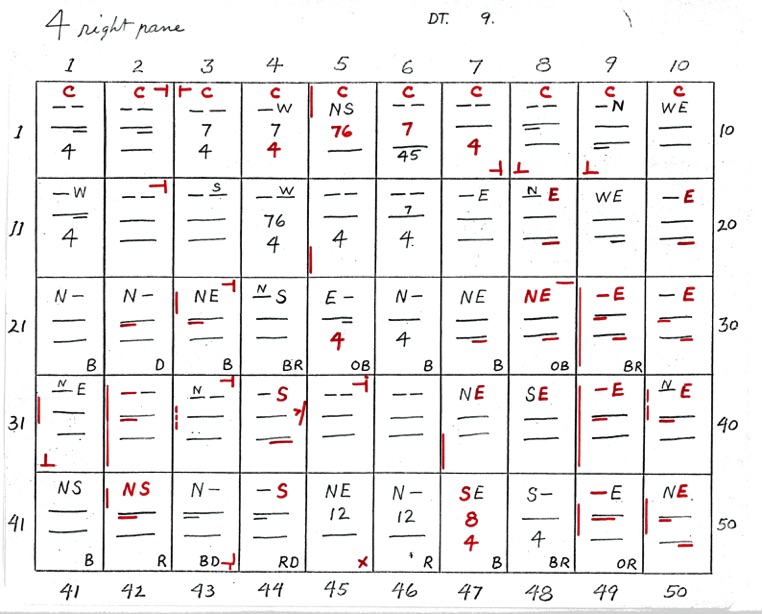
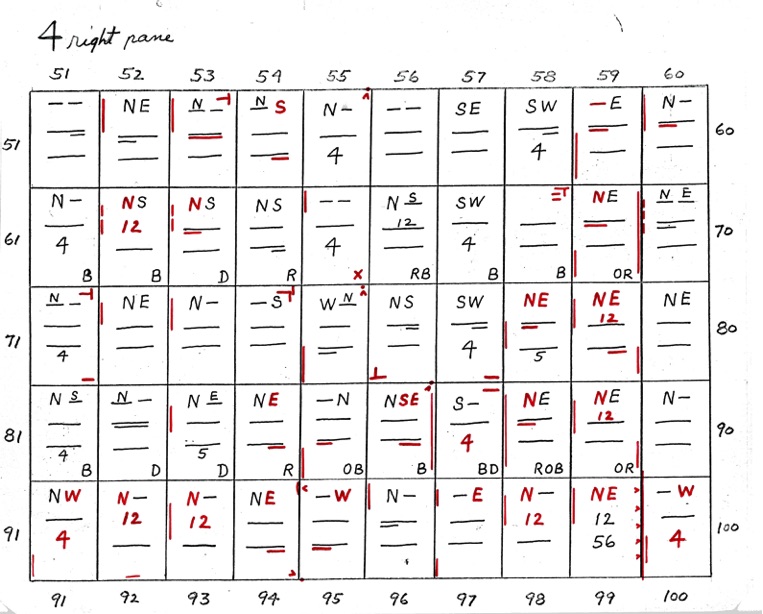
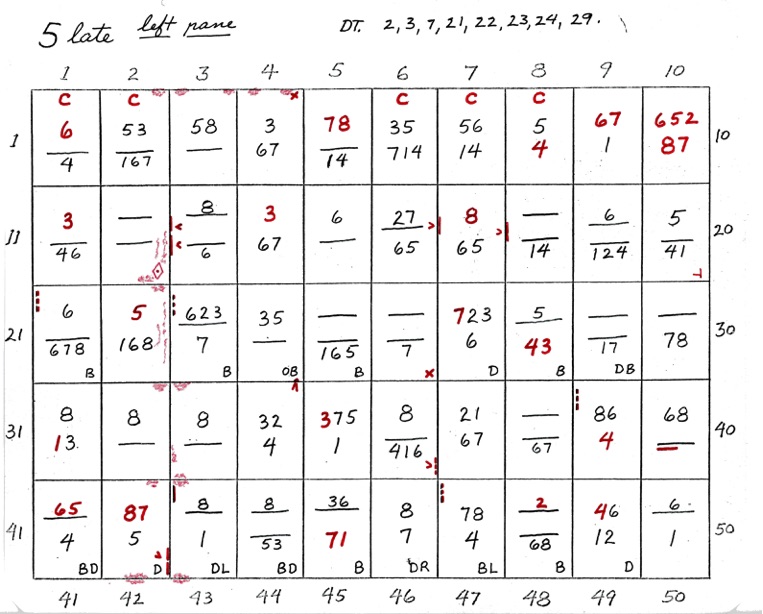
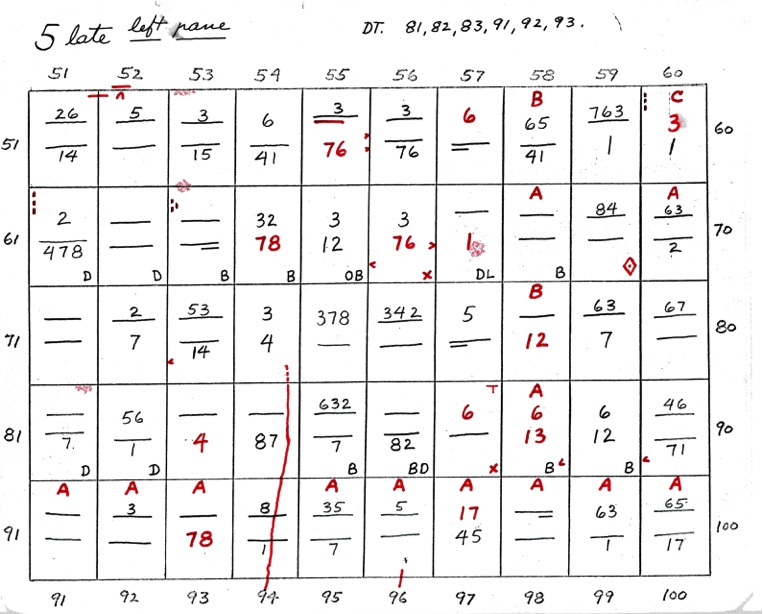
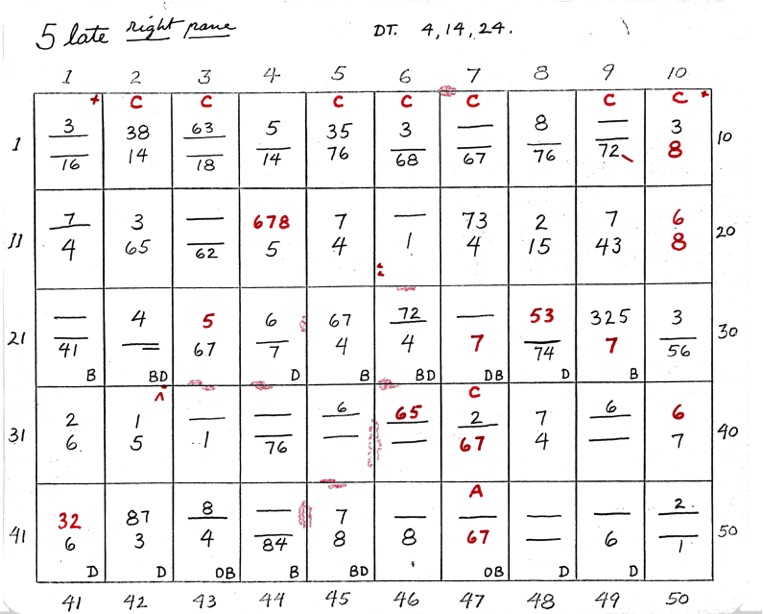
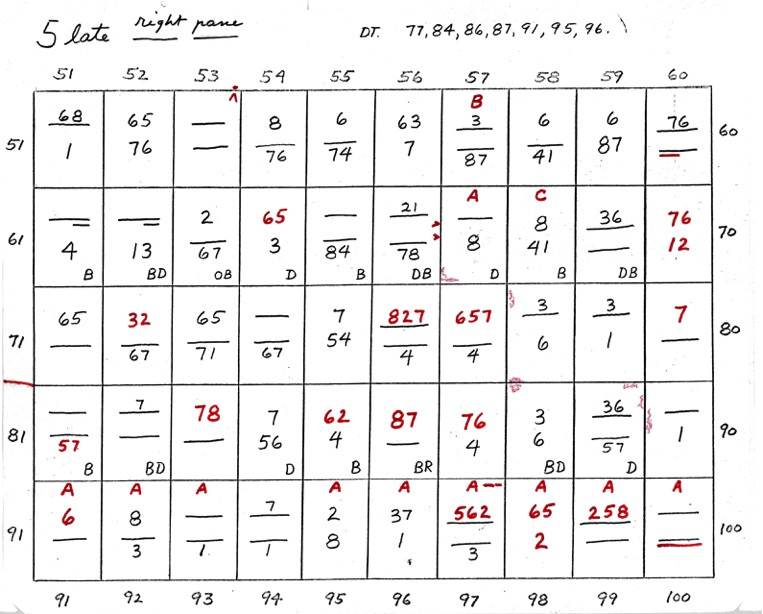
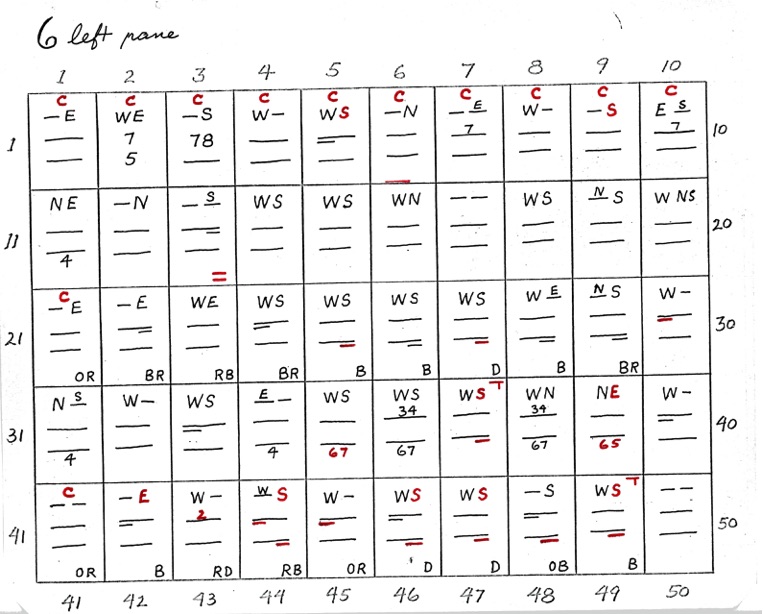
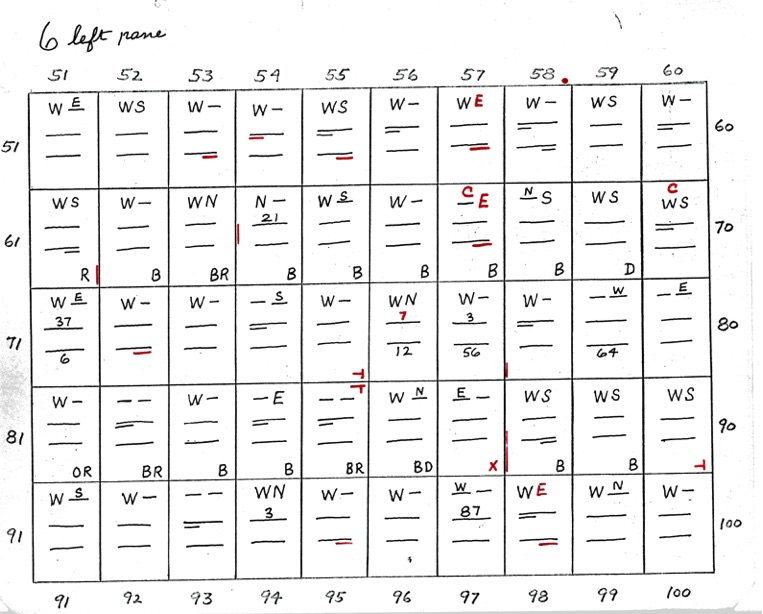
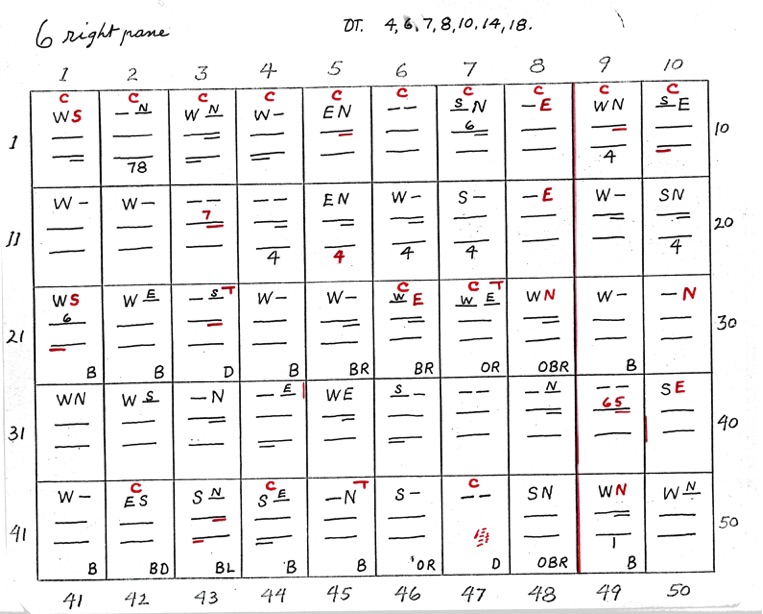
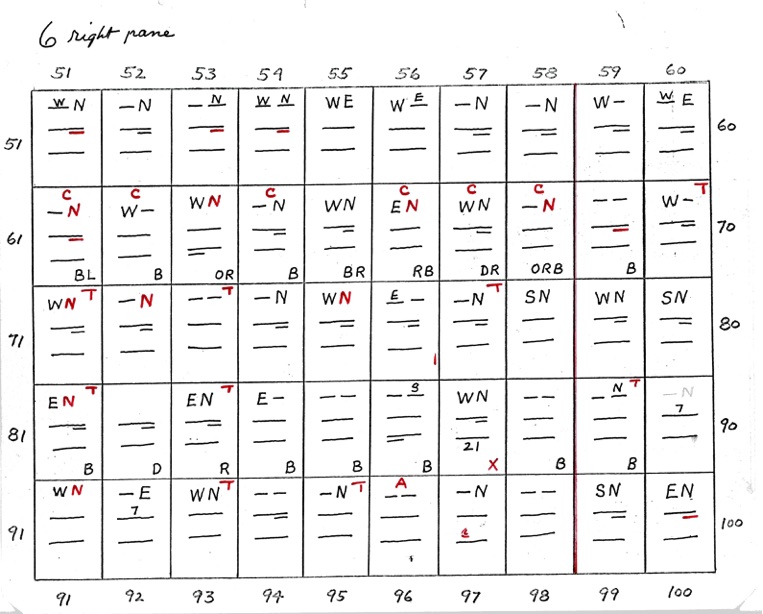
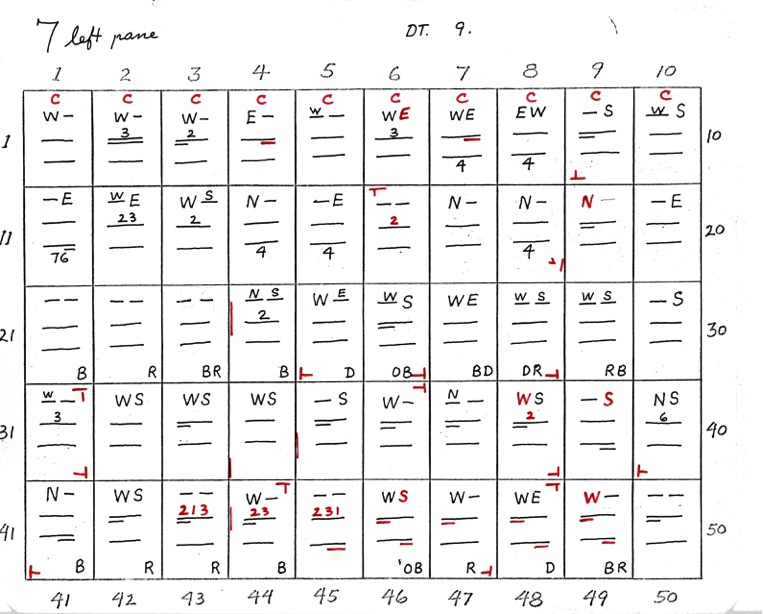
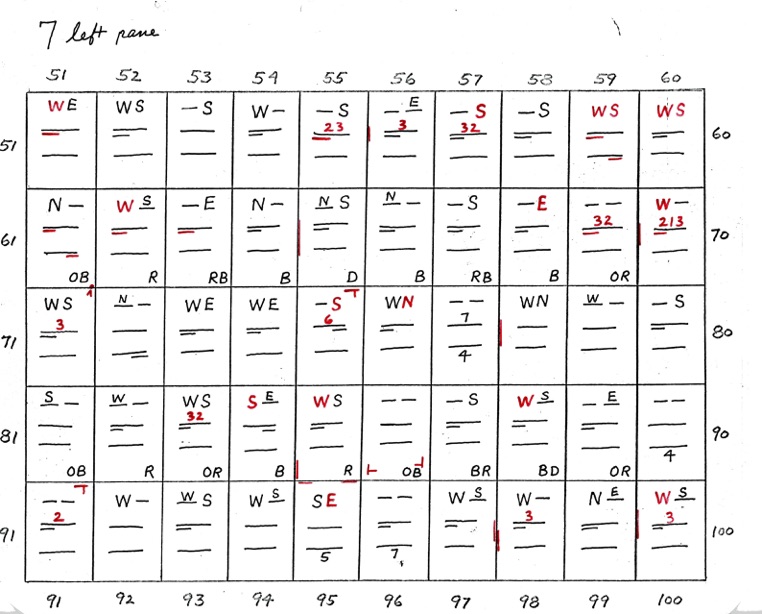
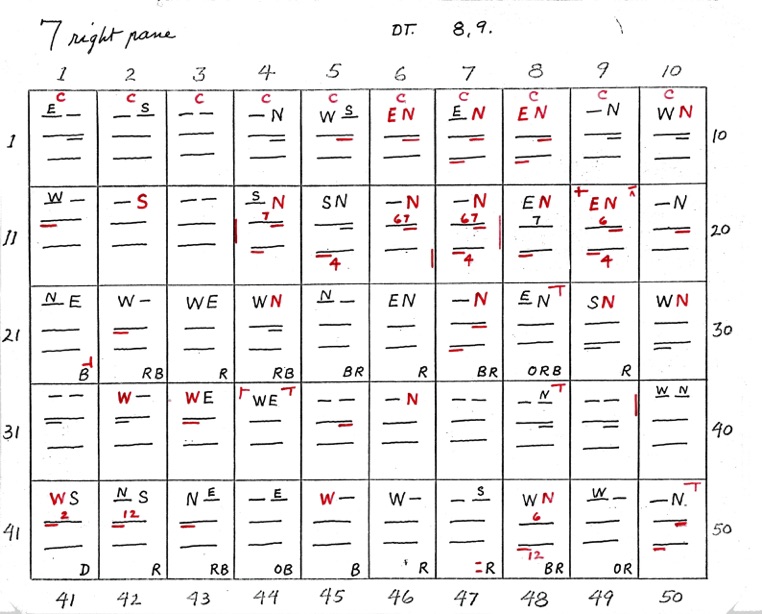
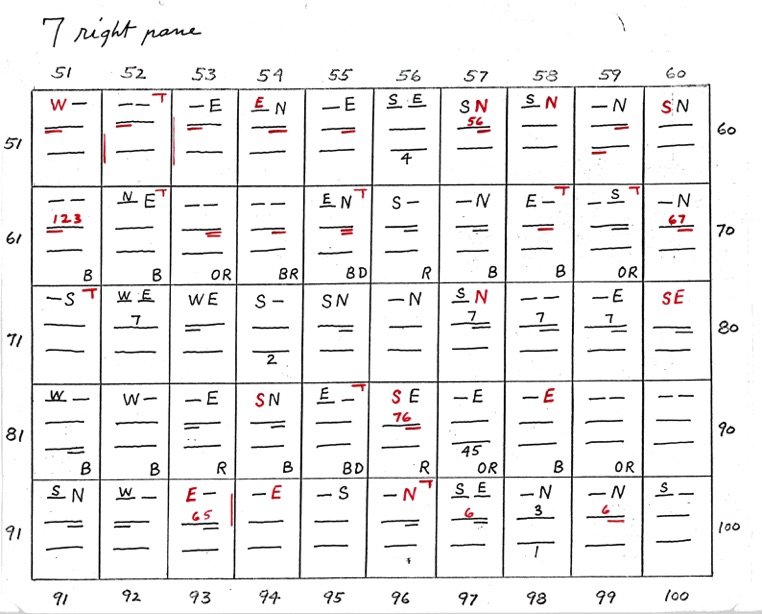
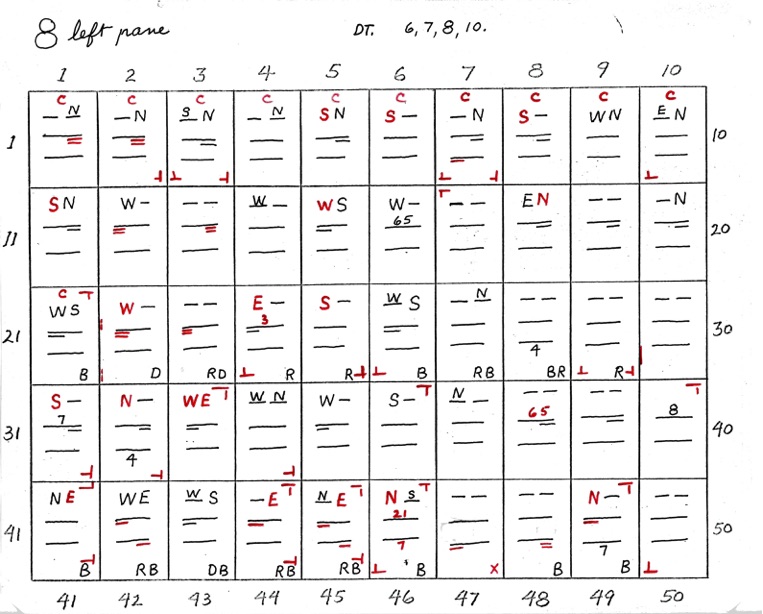
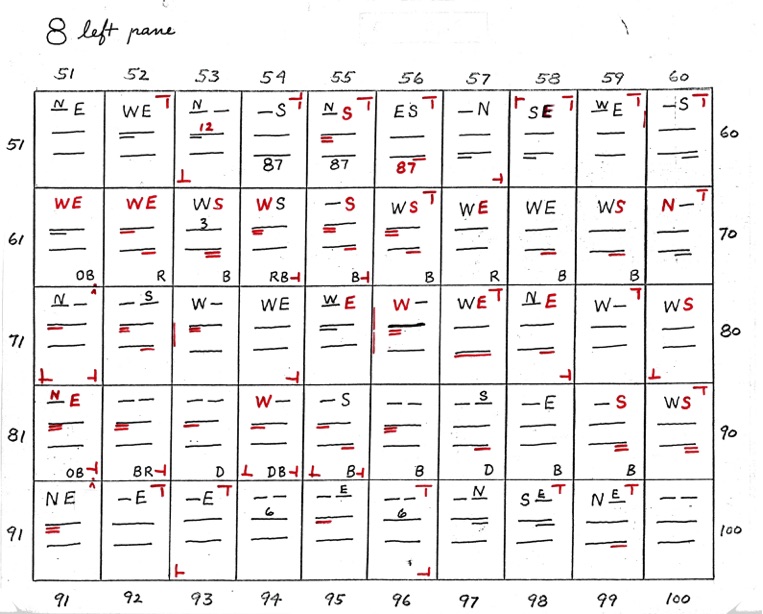
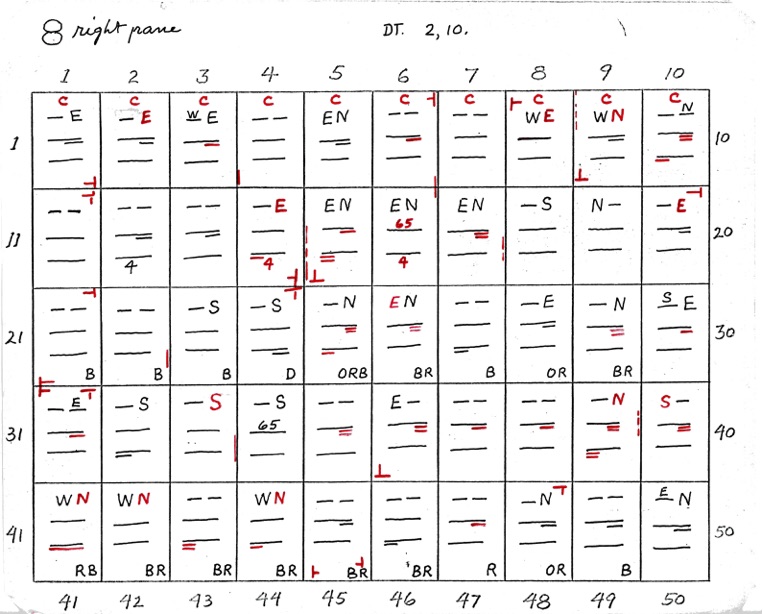
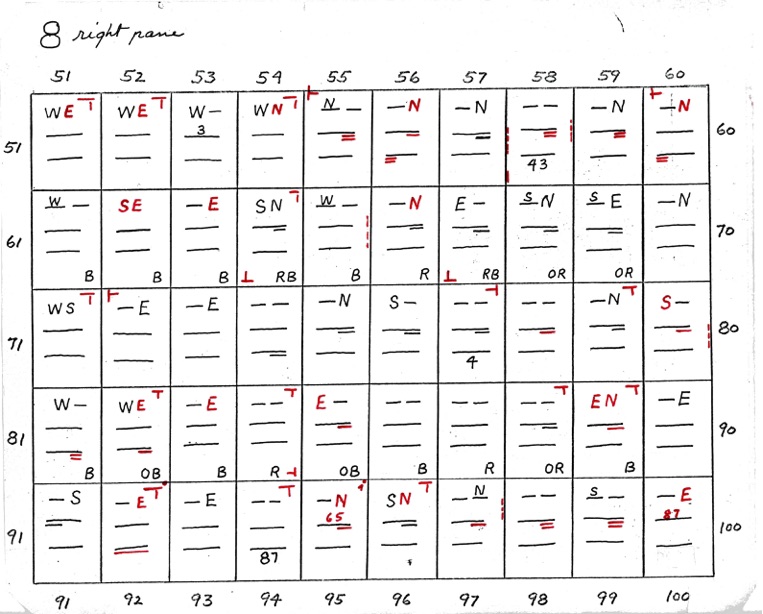
DeVere Card was a preeminent plater of this stamp from the 1930's until his death in 1980. Over many years he developed a plating system to help him plate stamps. During the mid-1970's he worked to develop an article for the USPCS Chronicle to show his plating system, but ill health and lack of color copier technology in those days thwarted his efforts. DeVere Card's plating system consisted of 52 plating charts. Each chart presented two-color diagrammatic notations of particular plating characteristics for one 50-stamp half-pane (or quarter-plate) of the thirteen plates of this plating. DeVere Card introduced a number of "Additional Plating Characteristics" that go far beyond the traditional recuts noted in Dr. Chase's book. All 52 DeVere Card Plating Charts are presented below.
The process to integrate the thousands of elements of DeVere Card's wonderful work into the Plating Wizard has begun and should be completed before the end of 2019. These additional plating characteristics will drive version 2.0 of this study, and are noted in bold type below. The following describes DeVere Card’s Plating System, reproduced directly from his notes (with minor edits):
EXPLANATION OF DEVERE CARD'S PLATING SYSTEM CHARTS
These charts are based upon two facts: 1. That the outer frame lines (when recut), and the inner lines (when present) were engraved on the stamp plate with a hand-engraving tool. That these lines have the minor variations ALWAYS PRESENT IN HAND WORK.
2. That most of the stamp design inside of the frame lines was mechanically impressed on the stamp plate by the transfer roll, with no resultant minor identifying features and variations.
For stamps with inner lines, the VARIATIONS IN SPACING are charted with 8 points as follows:
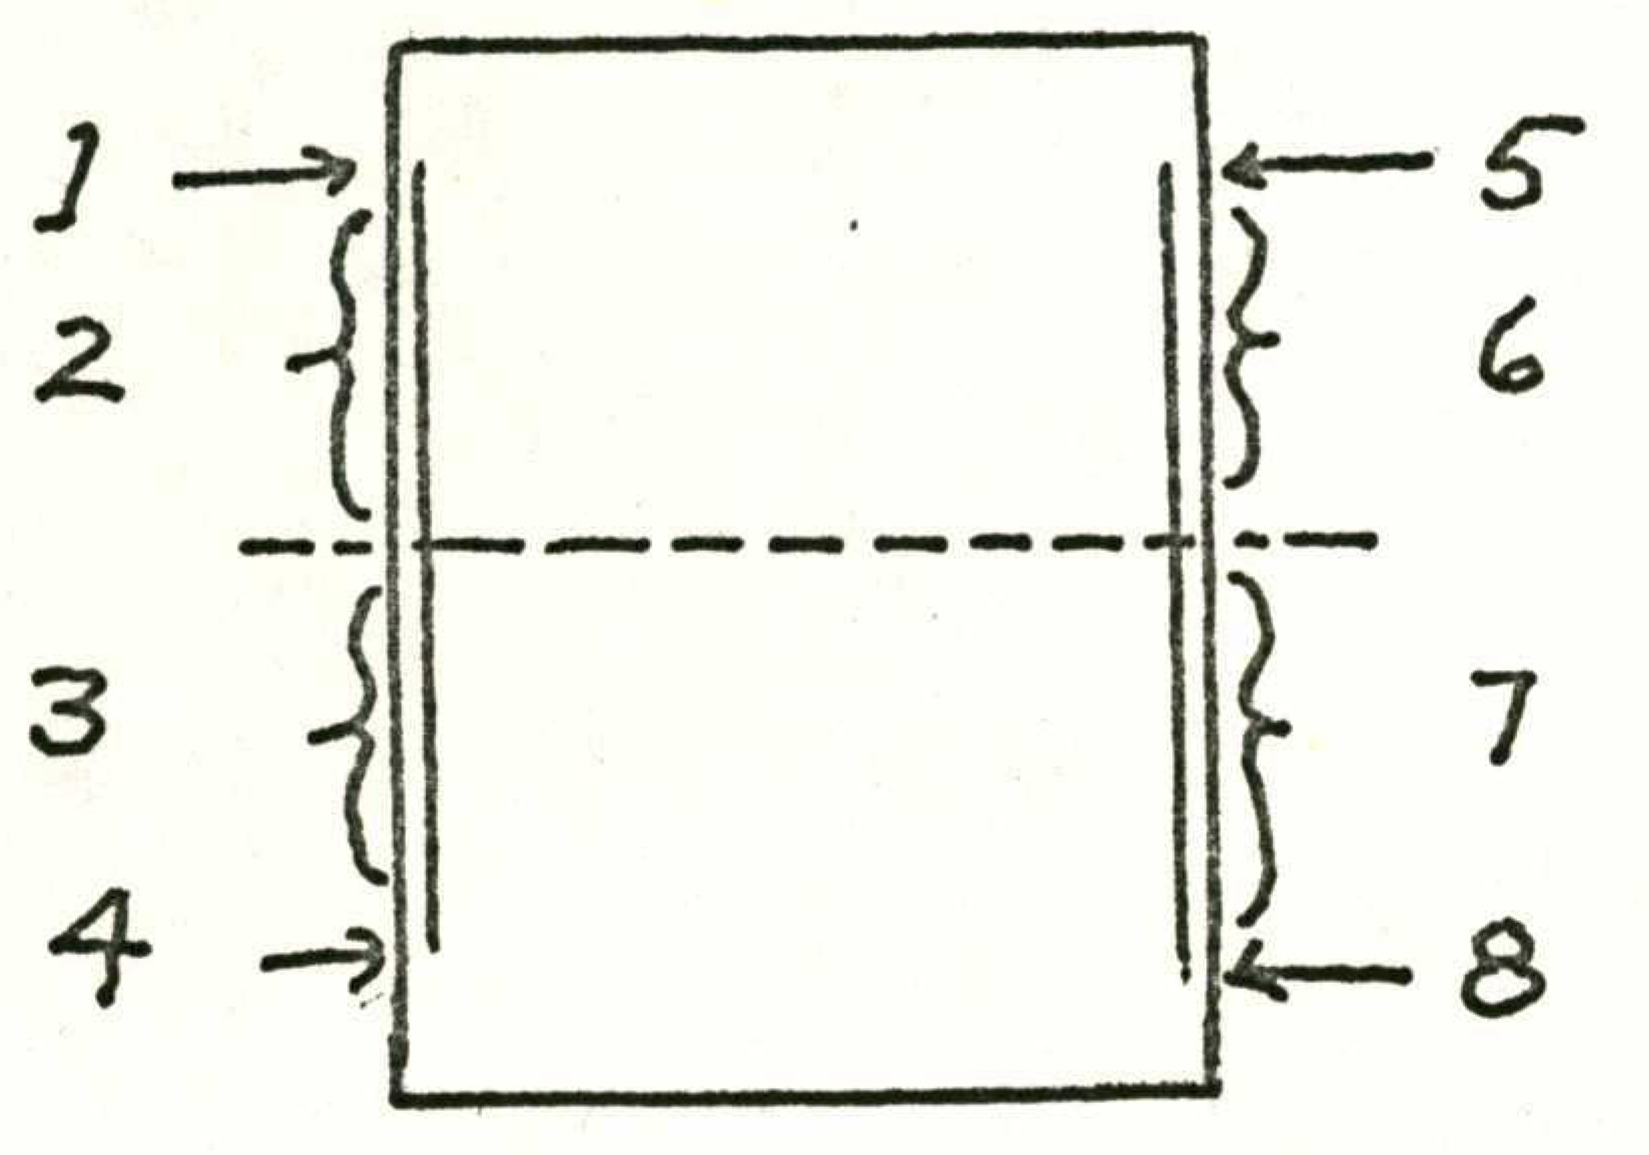
Diagram 1
For stamps without inner lines, the tessellated edges of the design form a far less definite area for comparison; the 8 points of diagram 1 are charted only when they are quite obvious and certain. However, the space between the side frame lines and the diamond blocks do furnish definite points of comparison: N, E, S, W diagram 2.
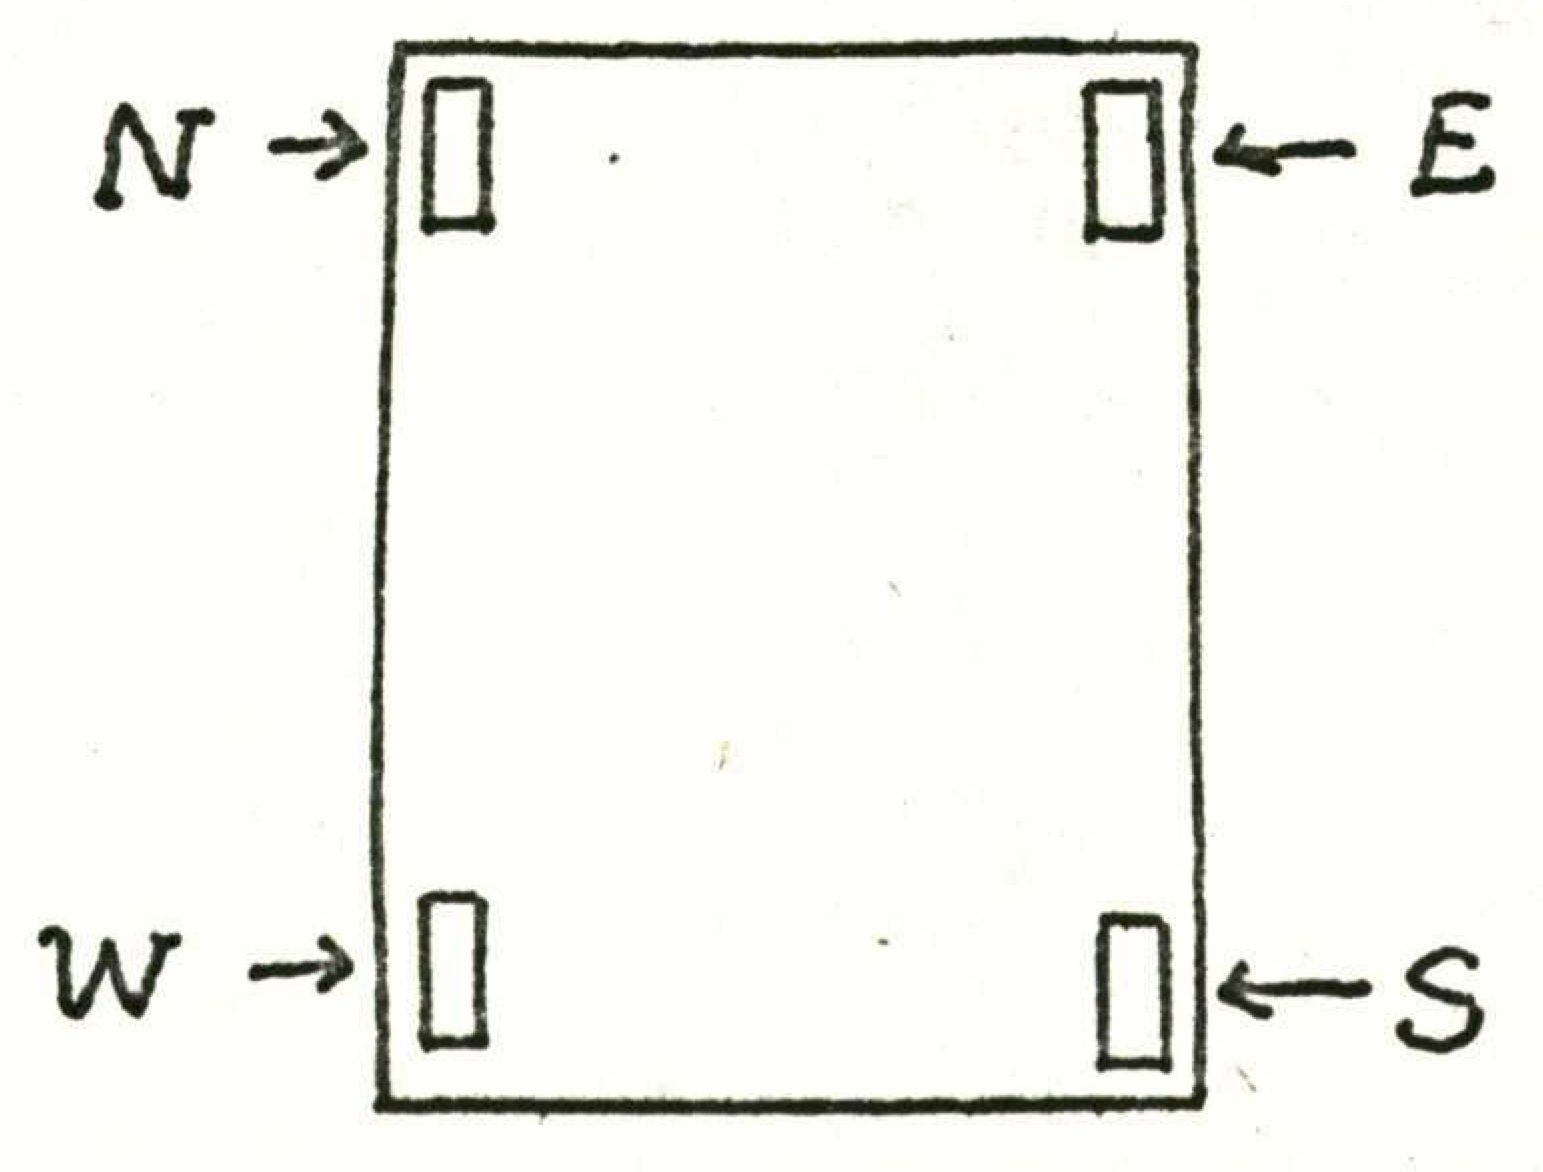
Diagram 2
In addition to these 12 points for comparison of spacing, the charts diagram the following:
- The relief, when other than in the normal position, for A or B.
- Triangle recuts, by lines in appropriate locations.
- Extended inner lines or outer frame lines, diagrammatically.
- Other recuts.
- Position dots are noted as follows:
- When the letter B or R is present the position dot is on, or touches, the bottom frame line or the right frame line.
- If preceded by O the dot is outside of the respective frame line.
- The letters L or D indicate that the dot touches and extends from the label or diamond block.
- Two letters show that the dot touches both indicated areas.
When two numbers, one above the other, are shown - the top number indicates closeness, in sequence, of the 8 points of diagram 1. The bottom number indicates wideness of the 8 points, in sequence. A straight line or dash indicates uncertainty. If the line is underlined at R or L it shows that the right or left side is closer or wider depending on whether the upper or lower line.
One or two letters or a line at the top of the position indicates: First letter shows the closest of the 4 points in diagram 2. Second letter is the widest point. A line indicates uncertainty for either the closest of widest or both. When obvious, the 8 points of diagram 1 are shown by numbers.
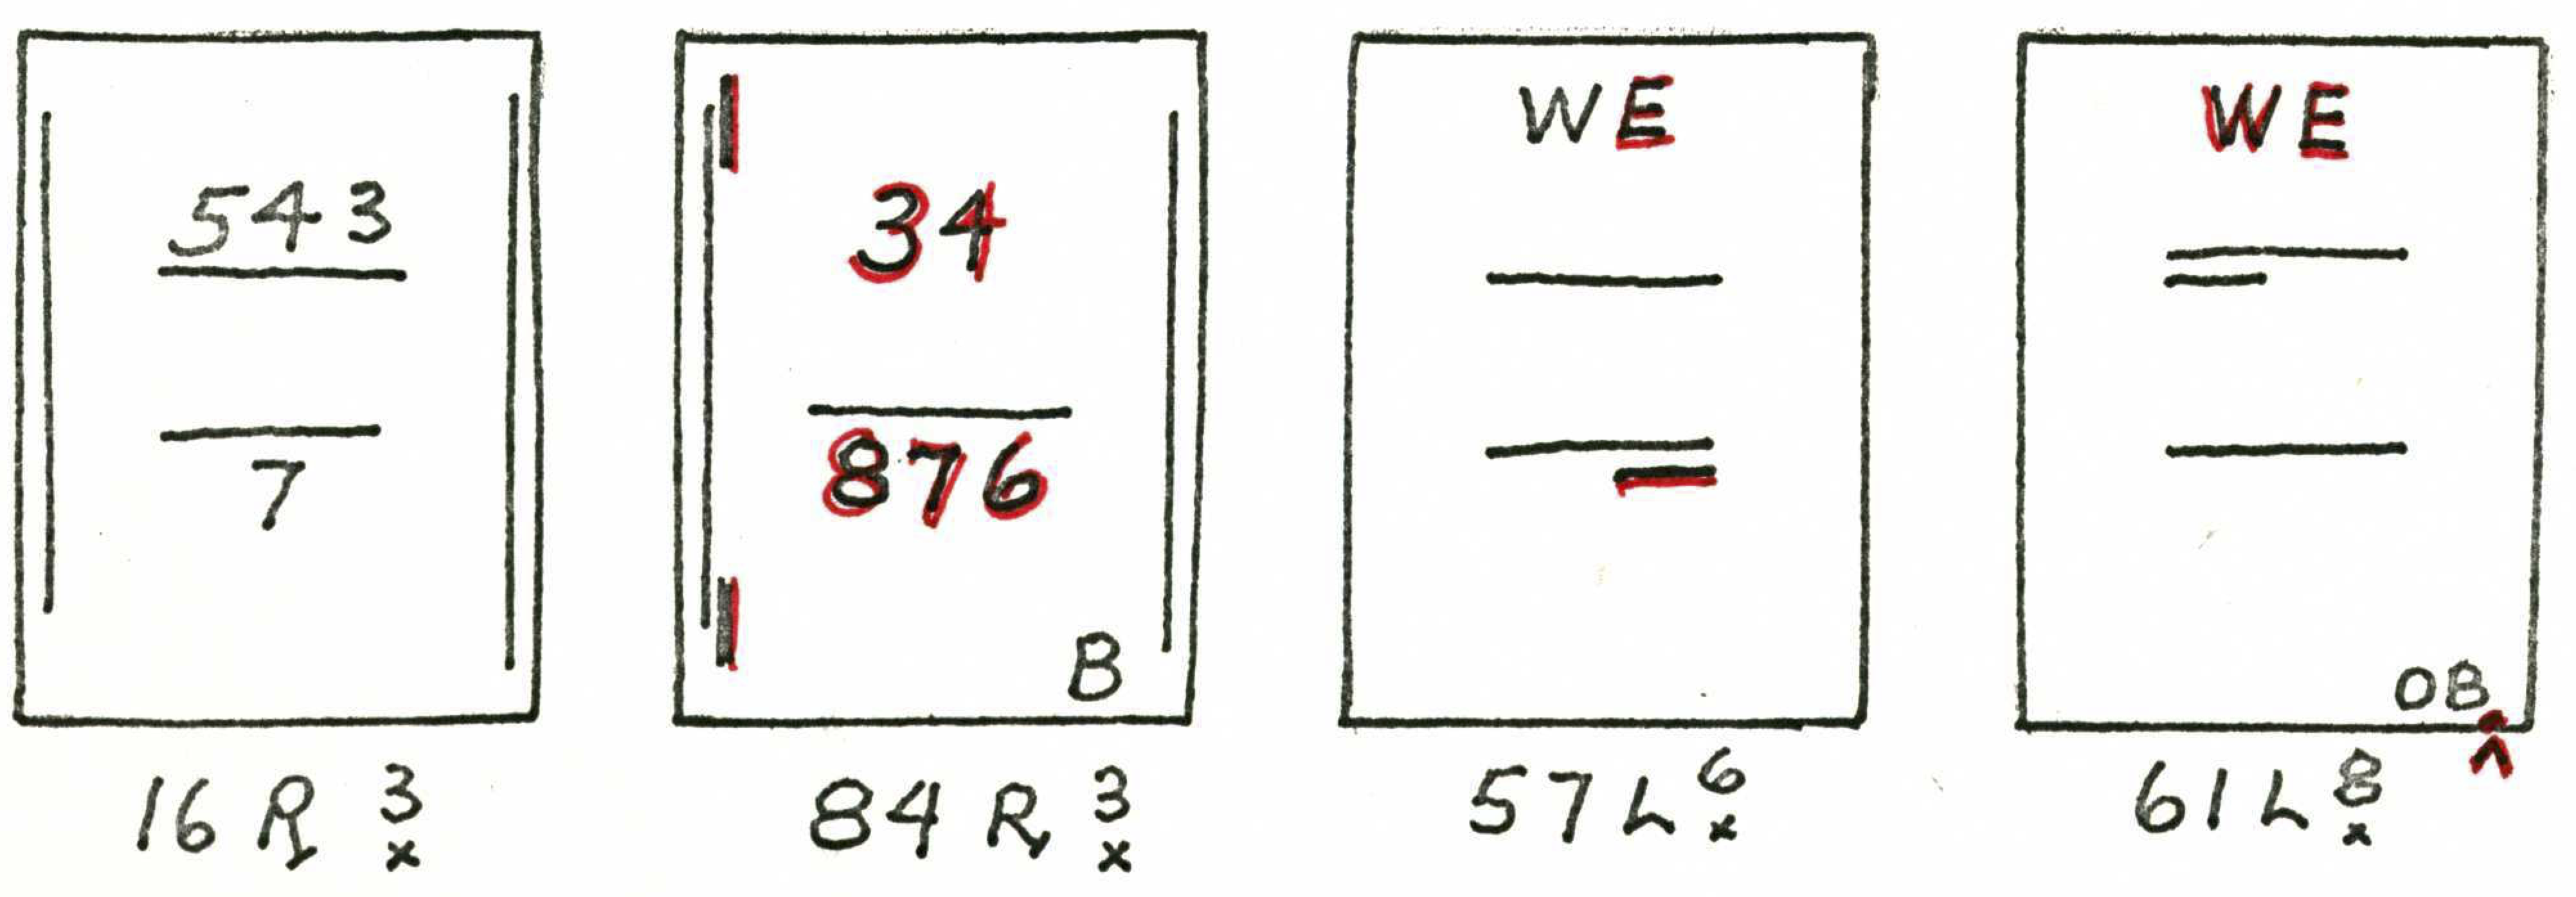
Examples Explained Below
16R3 – Points 5, 4, 3 of diagram 1 are closest, the sequence not certain. Point 7 is probably widest. 84R3 – Line recut in UL and LL triangles. Points 3 and 4 are closer than normal. Points 8, 7, 6 are wider than normal, the sequence of closeness is uncertain. Position dot on or touches bottom frame line. 57L6 – Point E is widest and is wider than normal. There are no obvious closest or widest points, as per diagram 1; the R side spacing is wider than the left. 61L8 – Point W of diagram 2 is closer than normal, point E wider than normal. Spacing at left side of stamp is closer than at right. Position dot is outside of bottom frame line.
The charts are printed in two colors. The red color is for emphasis, to call attention to features of the position that are of special aid in locating it.
To use the charts: Determine, if possible, the plate from which the stamp was printed. Find whether the stamp is A, B or C relief. Note any recuts. If the stamp has inner lines compare the spacing for the 8 points of diagram 1. If no inner lines, compare the spacing at the 4 points of diagram 2.
Chart a description of the stamp based upon the closest and widest spacing for the 8 points of diagram 1, or the 4 points of diagram 2 or perhaps a combination of both diagrams. Seek on the charts, in the proper relief positions, for a charted description, which is LIKE OR SIMILAR to the description you have written. Compare under a glass, with the Chase photos, or with already plated stamps, those that have a like or similar description.
The greatest advantage in using the charts lies in having visually available most of the information needed for plating. After some experience, it is possible to scan the charts at a quite rapid speed. In many cases the number of necessary microscopic comparisons is reduced to a very small number.
We have already stated that these charts are not intended to actually plate stamps; that they indicate where to look to plate by comparison with an already plated copy or by comparison with the Chase plate photos. Repeat – There are very few of the 2,600 positions that should be plated without microscopic comparison with a previously plated copy or with the photograph.
Errors in plating are of two kinds: A mistake of fact due to inability to recognize an exact similarity between two stamps. The cure for this type of mistake is more patience, and perhaps more experience. The second kind of mistake is entirely mechanical: Writing the wrong pane, i.e., R for L or the opposite, or writing an adjacent position instead of the correct one. It should be remembered that accuracy demands that the Plater check, and double check and the recheck the accuracy of his work.


